The Samsung/Google Galaxy Nexus and Android 4.1 Jelly Bean are a remarkable combination of hardware and software. If you're one of the less fortunate Galaxy Nexus owners and you haven't yet received Android 4.1 Jelly Bean, or you just want to restore from a custom ROM, this guide will show you how to install the stock Android 4.1 Jelly Bean on your Galaxy Nexus.
Before actually getting to install Android 4.1 Jelly Bean, you should know that this process will erase all the data on your Galaxy Nexus, so take notice and backup the contents of your smartphone before performing the install. The easiest and most conveniently available method to perform a backup is to select "MTP mode" when you connect your Galaxy Nexus to the computer and then copy all the data that you want to backup to your computer.
This guide can be used for the Verizon Samsung Galaxy Nexus as well, but only when Google posts the Android 4.1 Jelly Bean Factory images for the Verizon version. Also, when and if Google updates the factory images for the Galaxy Nexus you can follow the same steps to update regardless of the Galaxy Nexus model you have (GSM or CDMA).
Getting Started
In order to install Android 4.1 Jelly Bean, the following two items are required:
- The Android SDK which you can download from Google Developers
- The Android 4.1 Jelly Bean Factory images which you can download from Google Developers
- "yakju" for the GSM/HSPA+ Galaxy Nexus "maguro" -- this one doesn't include Google Wallet
- "takju" for the GSM/HSPA+ Galaxy Nexus "maguro" -- this one includes Google Wallet
- "mysid" for the VZW CDMA/LTE Galaxy Nexus "toro" -- this one is only for Verizon Wireless Galaxy Nexus
Setting the Stage
You have to install Android SDK and after it has finished, open Android SDK Manager and select only the following two items:
- Android SDK Platform-tools -- it contains the required programs to install Android 4.1 Jelly Bean
- Google USB Driver -- it contains the necessary Samsung/Google Galaxy Nexus drivers
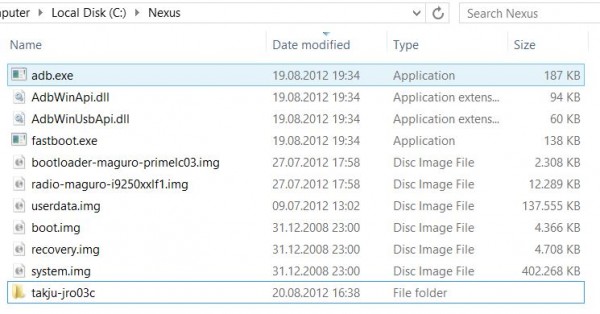
Once you have followed all the steps above, you should create a folder somewhere easily accessible within the command line. In this example I will use a folder named "Nexus" in my C:\ drive in Windows; it has the path-name "C:\Nexus".
 From the folder where Android SDK Platform-tools is installed (in my case it is "C:\Program Files (x86)\Android\android-sdk\platform-tools") copy the following files to the "Nexus" folder:
- adb.exe
- AdbWinApi.dll
- AdbWinUsbApi.dll
- fastboot.exe
You have to extract the Android 4.1 Jelly Bean factory image to the "Nexus" folder, using a program like WinRAR or 7Zip. In this example, as a reference point, I will use the "takju" factory image, which is currently named "takju-jro03c-factory-bf087655.tar".
- Extract the "takju-jro03c-factory-bf087655.tar" archive. A new file, named "takju-jro03c-factory-bf087655", will appear in the "Nexus" folder.
- Rename it to "takju-jro03c-factory-bf087655.tar" and extract it in the same folder it is placed in. Now a new folder named "takju-jro03c" is created in the "Nexus" folder.
- Extract the "image-takju-jro03c.zip" archive from the "takju-jro03c" folder it is placed in.
- You can delete "takju-jro03c-factory-bf087655.tar" from the Nexus folder, as it is no longer needed.
- Now you must copy the following files from the "takju-jro03c" folder to the "Nexus" folder:
- boot.img
- bootloader-maguro-primelc03.img
- radio-maguro-i9250xxlf1.img
- recovery.img
- system.img
- userdata.img
If you have completed step four, you should have ten files in your Nexus folder (11 if you have the Verizon model) and the "takju-jro03c" folder. If you have a Verizon Samsung/Google Galaxy Nexus and you have downloaded the Verizon factory image you should have one more file, named "radio-cdma-toro-i515.fc04.img" for Android 4.0.4 Ice Cream Sandwich. Once Google updates it to Android 4.1 Jelly Bean it will have a different name and you will use the new name of the file to update your device.
To be able to transfer and flash the files at step number five, which will update the Galaxy Nexus to Android 4.1 Jelly Bean, USB Debugging can be activated from "Settings" -> "Developer options." From there, you can proceed to install the drivers for "fastboot mode." To install the drivers, follow these steps:
- Power off your Galaxy Nexus
- Press and hold Volume Up and Volume Down then press and hold the Power button; the Galaxy Nexus will now enter "fastboot mode."
- Go to Device Manager (Computer -> Properties -> Device Manager in Windows 7/8) and identify the Galaxy Nexus; for me it shows up as Android 1.0.
- Right click Android 1.0 and select "Update Driver Software," then select "Browse my computer for driver software"
- Select "Let me pick from a list of device drivers on my computer," then click "Next"
- From "Have Disk..." option go to the folder where you have Google USB Driver installed (for me it's "C:\Program Files (x86)\Android\android-sdk\extras\google\usb_driver") and select "android_winusb.inf"
- Out of the three options select "Android ADB Interface" and validate any future warning window to install the driver.

The Actual Installation
Everything is ready to start the installation process, but to do so a command window must be opened. Windows Key + R opens "Run"; type in "cmd" and the command window opens. Typing "cd C:\Nexus" and pressing Enter sets the "Nexus" folder as the working directory. Now, type in the following commands to install Android 4.1 Jelly Bean:
- fastboot devices -- this command will show the devices connected to the computer; if there is not a device listed then the drivers have been improperly installed and steps 1 through 6 must be redone
- fastboot oem unlock -> you have to accept the prompt in order to continue -- this command will unlock the bootloader, but it will also erase the data on the device which is why a backup is necessary
- fastboot reboot-bootloader -- this command will reboot the bootloader
- fastboot flash bootloader bootloader-maguro-primelc03.img -- this will flash the bootloader from the factory image
- fastboot reboot-bootloader
- fastboot flash radio radio-maguro-i9250xxlf1.img -- this will flash the radio from the factory image
- fastboot reboot-bootloader
- For Verizon Galaxy Nexus only: fastboot flash radio-cdma-toro-i515.fc04.img -- to be replaced with the name of the file from the Android 4.1 Jelly Bean image as mentioned previously
- For Verizon Galaxy Nexus only : fastboot reboot-bootloader
- fastboot flash system system.img --this will flash the system image
- fastboot flash userdata userdata.img -- this will flash the user data image and also deletes everything on the SD card
- fastboot flash boot boot.img -- this will flash the boot image
- fastboot flash recovery recovery.img -- this will flash the recovery image
- fastboot erase cache -- this will erase the cache
- fastboot reboot -- this will reboot the device so you can now use Android 4.1 Jelly Bean
- fastboot oem lock -- this will lock your bootloader and it is an optional step
You can choose to not complete step number 16 and leave your bootloader unlocked. That's up to you to do, but you should lock it back up if you ever plan to send your Galaxy Nexus to the carrier/manufacturer for warranty claims. Leaving it unlocked will be easily noticed and it will void your warranty. But if you lock your bootloader you will lose all the data on your device next time you want to manually update Android because you will have to go through step number two again; leaving it open will make it easier to update next time.
This method will insure future OTA updates for the Samsung/Google Galaxy Nexus directly from Google and it can be used to convert any Galaxy Nexus build, like "jakjuxw" for instance (which I previously had), to the "yakju" and "takju" builds from the factory images available on Google Developers.
Final Points
I have to mention that the first time I tried to update to Android 4.1.1 Jelly Bean from Android 4.0.4 Ice Cream Sandwich I skipped a step and my Galaxy Nexus was stuck at the "Google" logo. I simply started again and have completed each step; after I rebooted the Galaxy Nexus, Android 4.1 Jelly Bean loaded. It's important to read everything carefully and to go through all the steps. I have used Windows 7 and Windows 8 to update my Galaxy Nexus, so the guide works perfectly even for the latest Microsoft operating system. If Google releases another Android update, by following these steps, you can update to future versions as well.

